Basic flashcard game in JavaScript
The use case
When the page loads up, a picture will be shown. The user will guess who or what the picture is by typing his answer on the provided text field and clicking the submit button.
If the user guesses correctly, proceed to the next picture and let the user guess again. If the guess is incorrect, display a “Try again message”, clear the text field and await for the response.
Contents
- The use case
- Solution
- The JavaScript Part
- Make sure the simplest scenario is working
- Complexity
- Full code
Solution
Will make the html portion quite spartan. We won’t use any fancy divs or nested tables so that we won’t get distracted by styling clutter. We will handle the image using the img tag. We will use the old school input element for the text field and we will use the button element for, well, the button.
The JavaScript part of our solution will be in an external file named script.js, so our JS and HTML codes don’t mingle up. We will use JQuery for DOM manipulation, surely by now you must be tired of typing document.getElementById. We can do this by embedding two script elements in the head region of the html code.
<script charset="utf-8" src="jquery-1.11.0.js"></script>
<script charset="utf-8" src="script.js"></script>
The script tag above assumes that you have downloaded the JQuery library into your work area. It also assumes that the JQuery file and script.js is located on the same directory where the html file is.
The full code listing for the html part is below.
<!DOCTYPE html>
<html>
<!--  index.html -->
<head>
  <script charset="utf-8" src="jquery-1.11.0.js"></script>
  <script charset="utf-8" src="script.js"></script>
  <style type="text/css" media="screen">
    #status {
      color: #CACACA;
      font-weight: normal;
    }
    * {
      font-family: Helvetica, Arial, serif;
    }
    img {
      display: block;
      margin-top: 30px;
      margin-bottom: 30px;
      height: 300px;
    }
    body {
      margin: 0 auto;
      width: 80%;
    }
  </style>
</head>
<body>
  <h4 id="status">The Status</h4>
  <img id="a"/>
  <input type=text id="answer">
  <button id="clickme">Submit</button>
</body>
</html>
The JavaScript Part
Create a file named script.js on the same folder where you created index.html. It is not necessary, neither it is always desirable to put the JS files on same folder as other files such as html or images, but we chose to do it that way to keep the codes and directory structure simple.
First thing we need to write is the block of code where we will put all of our subsequent JavaScript codes. Many other programs require such an entry point. If you have experience coding in other languages, you might remember that there is a function main which serves as the program entry point. In JavaScript however, you cannot simply write a function called main and proceed from there. Well, actually you can write a function and name it main, but that won’t do anything. It will simply be a regular function. It won’t have magical powers that makes it a program entry point.
JavaScript is event aware. You can listen for events and then write code when that event is raised. There are two sources of events in our use case. The user will raise an event when he types his answer on the text field and when he clicks the button to submit his answer. The browser also raises events. When a page is pulled from a web server, it goes through some stages
- It scans all the html tags and renders them
- If you have some directives to pull files, e.g. a CDN hosted JQuery library, it will pull that from the server. When it is done processing the directives on the head region, it goes to the body region. At this point, it raises an event that the body part of the html document is being loaded.
- When it encounters a script tag, it momentarily stops rendering any html element. It needs to stop because JavaScript is capable of writing and changing the DOM (Document Object Model), the browser will wait for all the script tag to be processed before it can continue rendering html elements. When all the DOM elements have been processed, the browser raises an event saying that the “document is ready”.
- If you have image tags, the browser will make another request to the server to download the image files
- Once all the resources have been completely downloaded and rendered, the browser raises an event that says it the “window is ready”. Ideally, this is the point where it is safe to do anything with JavaScript because all the DOM resources that your code anticipates, are already available. In some occasions, you might want to start doing things before the document is ready, say during body onLoad but for this example, we will wait for the document to finish loading.
In order to write our program entry point, we will choose an event that the browser will raise, and use it as the entry point.
$(document).ready(function(){
  // this is our entry point
});
The above snippet is a JQuery code. It binds our code into document.onload event of the browser. When the browser has finished processing all the DOM elements in the html, it will raise the document.onload event. We are simply latching on to that event. Think of this code block as some sort of initialization routine. If you need to define arrays, variables or bind buttons to events, this is the place to do it.
Make sure the simplest scenario is working
The best advice I have ever given to beginning programmers is to make sure the simplest scenario is working— next only to “don’t forget the semicolon”. A complex system does not start out to be complex, they start out as simple systems. They get complex in time. Make sure that the building blocks of your code are sound and that they are working.
We need to make sure that our program entry point actually does something. A small noticeable change in the UI will do. Let’s change the text of the heading element.
$(document).ready(function(){
  $("#status").val("hello there");
});
Open index.html using the browser. You should see the “Hello there” message when it loads. It will confirm that our code is actually running when the page loads. If you don’t see the message, you need to check your code for spelling and other typing errors. If you know how to use the debugging tools in the browser such as FireBug in FireFox and the developer tools of Chrome or Safari, they will help you find the errors faster.
Next step is to display just a single image when the page loads. That can be managed using the following code
$(document).ready(function(){
  $("#status").val("hello there");
  $("#a").attr("src", "bugsbunny.jpg");
});
The code above assumes the file bugsbunny.jpg is on the same folder where index.html and script.js are. Right after we get the IMG element using the #a selector, we changed the SRC attribute programmatically using the JQuery attr function. That code should display the contents of the image.
Next thing to manage is accept user input via the text element and do something with when he clicks the button. For that, we need to bind the click event of the button to our code.
$(document).ready(function(){
  $("#status").val("hello there");
  $("#a").attr("src", "bugsbunny.jpg");
  $("#clickme").click(function() {
    var useranswer = $("#answer").val();
    $("#status").html(useranswer);
  });
});
To bind the button to our code, we selected it via JQuery and invoked the the click function. The JQuery click function takes a single argument. You can put a named function inside it or an anonymous function. Either way, JQuery will call whatever you put inside the click function when the user clicks the button.
Our click handler is quite simple. It extracts the value of the text field and changes the message of the heading element to whatever the user has typed in the text field.
We will add some more codes so we can check the user’s input against the correct answer.
$(document).ready(function(){
  $("#status").val("hello there");
  $("#a").attr("src", "bugsbunny.jpg");
  $("#clickme").click(function() {
    var useranswer = $("#answer").val();
    $("#status").html(useranswer);
    if (useranswer == "Bugs Bunny") {
      alert("correct");
    }
    else {
      alert("try again");
    }
  });
});
An if-else statement provides a simple validation for our code. Note that the if branch is inside the click handler block. We will perform this check only when the button is clicked. If you place it outside the click handler block, it will be evaluated during page load—which does not make sense.
The answer key in our example code is hard coded, in a real life application this should be pulled from a data structure like a database or a file.
At this point, we know we can display a picture, wait for a user’s input and validate whether it is correct or otherwise. We can now use this as a building block for the more complex portion of the solution.
Complexity
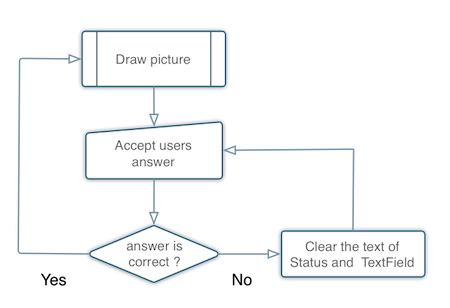
The complexity of the use case, clearly, does not lie in mechanics of input, validation and graphics display. Those are easy enough tasks to manage. The slight difficulty in the use case is in the workflow. We need a simplistic game engine to satisfy the use case requirement.
- Display the graphics
- Accept input from the user
- If the user got it right, clear the text field, update the heading status, then move on to the next round
- If the user got it wrong, clear the text field, update the heading status and keep him in the current round until he gets it
This is the basic workflow that we need.
If you look at it closely, you might see that it resembles the basic engine for a flash card application. A flash card is a set of cards that one uses as a study aide. On one face of the card are either words, numbers, pictures or any combination of the three. The front side of the card usually is a question. And on the other side of the card is the answer. The idea is to go through a set of cards, show the front side to the user and let him guess.
In the previous section, we explored how to display just one card and let the user guess. That much we can do. The challenge is how to make more cards and let the user go through all of them. Using the flash card analogy, let’s rewrite our game engine workflow.
- Take out one card from the deck
- Display the front side of the card
- Let the user guess
- If the user guesses right, clear the text field, update the heading status and proceed to the next card—which means go back to step no. 1
- If the user guesses wrong, clear the text field, update the heading status and let the user guess again Now that we have clarified our solution approach, the next task is to figure out how to translate them into codes.
There are two data structures that we need to figure out. The card and the deck. The card data structure cannot be held by simple scalar variables. It needs a more capable and complex data structure. We want it to hold the picture and the answer key. The deck is really just a collection of cards,
There are lots of options for us. At first glance it looks like a relational database is good tool to represent our data structure. A record in the database will represent a card and a deck of cards is a table. We can also use an XML file. Or we can use JavaScript objects. For the purpose of our practice, we will use JavaScript objects to represent the card and we will store all these cards inside an Array. The Array data structure is our deck.
The card data structure can be represented in code like this
var card1 = {
  card: 1,
  picture : "bugsbunny.jpg",
  answertext : "Bart"
};
The above code shows how to declare an object in JavaScript Object Notation (JSON).
We need to somehow define each card and populate the deck with it. We will use the built-in JS Array to represent the deck.
var deck = new Array();

// OTHER STATEMENTS

var card1 = {
  card: 1,
  picture : "bugsbunny.jpg",
  answertext : "Bugs Bunny"
};

var card2 = {
  card: 2,
  picture : "bart.jpg",
  answertext : "Bart"
};

deck.push(card1);
deck.push(card2);
Next task is how to pop a card from the deck and display the picture. What we want is to take the top card from the Array, make it available for data retrieval and display the picture.
var currcard = null;

function Draw() {
  currcard  =  deck.shift();
  $("#a").attr("src", currcard.picture);
}
The variable currcard is initially defined as null. It was defined outside the Draw function so that it other functions will have access to it. We will need the data stored on the current card when we check the user’s answer against the answer key (which is stored on the current card).
The shift method of the JS Array provides the mechanism to take the top card from the deck. When you call shift, it removes whatever is on the top element of the array and returns its value—it allows us to store the return value to a variable, that was why it was assigned to currcard.
Full code
We now have the essential technical details and workflow to put it all together. The program entry point is when the DOM has finished loading. There are two data structures that we will use, the card data structure which is an object literal (JSON format) and the dec which will hold the collection of cards, the deck will just be a standard JS Array.
First thing to do is to initialize our cards and deck. We will give them some values. These codes are encapsulated in the function named Init.
When the cards and the deck has been initialized, we call the Draw function. It pops the top card and displays the picture associated with that card. It also stores the value of the top card to the variable currcard because we will need the value of current top card when we compare the user’s answer to our answer key.
// script.js
$(document).ready(function() {
  var deck = new Array();
  var currcard = null;

  Init();
  Draw();

  // EVENT HANDLER

  $("#clickme").click(function() {
    var useranswer = $("#answer").val();
    $("#status").html(useranswer);

    if (currcard.answertext == useranswer) {
      alert("correct");
      ClearText();
      Draw(); // GET the next card
    }
    else {
      alert("try again");
      ClearText();
    }
  });

  function ClearText() {
    $("#answer").val("");
    $("#status").html("X");
  }

  function Init() {
    var card1 = {
      card: 1,
      picture : "bugsbunny.jpg",
      answertext : "Bugs Bunny"
    };

    var card2 = {
      card: 2,
      picture : "bart.jpg",
      answertext : "Bart"
    };
    deck.push(card1);
    deck.push(card2);
  }

  function Draw() {
    currcard  =  deck.shift();
    $("#a").attr("src", currcard.picture);
  }
});
When the user types his answer and clicks the button, we simply compare the value of currcard.answertext which is our answer key to whatever the user has typed on the text field.