How to Handle Clicks in Android
To follow the tutorial, you’ll need to create a project or download the project file here. I created this project using Android Studio 4 (Canary version, at the time of writing). Below are the project details;
- Name of project. My Application
- MIN SDK. Android 10, API level 29
- Form factor. Phone and Tablet
- Language. Java
You can add a Button View object to the layout file either in Design Mode or in Code View. The Code View of /app/res/activity_main.xml, with the Button View added, looks like the following
Listing 1. /app/res/activity_main.xml
<?xml version="1.0" encoding="utf-8"?>
<androidx.constraintlayout.widget.ConstraintLayout xmlns:android="http://schemas.android.com/apk/res/android"
  xmlns:app="http://schemas.android.com/apk/res-auto"
  xmlns:tools="http://schemas.android.com/tools"
  android:layout_width="match_parent"
  android:layout_height="match_parent"
  tools:context=".MainActivity">

  <Button
    android:id="@+id/button"
    android:layout_width="wrap_content"
    android:layout_height="wrap_content"
    android:text="Button"
    android:textSize="30sp"
    app:layout_constraintBottom_toBottomOf="parent"
    app:layout_constraintEnd_toEndOf="parent"
    app:layout_constraintStart_toStartOf="parent"
    app:layout_constraintTop_toTopOf="parent"
    app:layout_constraintVertical_bias="0.163" />

</androidx.constraintlayout.widget.ConstraintLayout>
If you want the Button to do something interesting when it’s clicked, you need to do the following;
- In MainActivity.java, get a programmatic reference to the Button View object
- Still in MainActivity, create a listener object (a ClickListener object)
- Override the onClick method of the ClickListener object
- Bind the listener object to the Button object
First step is to get a reference to the Button object. You can do this with the findViewById() method, like this
Button btn = (Button) findViewById(R.id.***button\***);
You need to pass the resource ID as an argument to this method; the resource ID of the button is R.id.button. The R.java file is generated by the Android Runtime during compilation so we can use it to reference the View objects in the layout files.
Second step is to create a listener object. Since we want the Button to react to click events, we will create an OnClickListener object, like this
View.OnClickListener listener = **new** View.OnClickListener() {
  @Override
  **public void** onClick(View view) {
    // statements;
  }
};
Third step it override the onClick method on the OnClickListener object. Whatever you want to happen when the button is clicked, you should put it inside this method.
Fourth step is to bind the listener object to the Button object, like this
btn.setOnClickListener(listener);
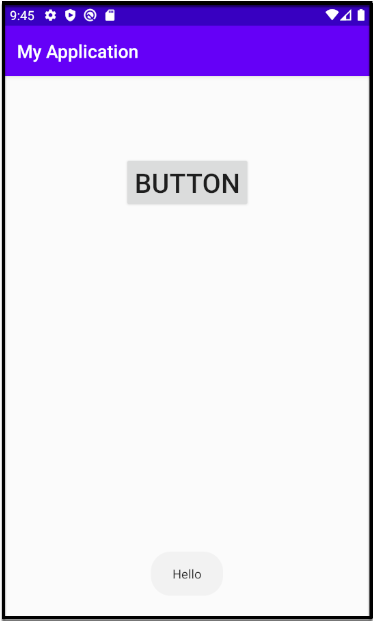
Now, you can run the application. Test it either in the emulator (AVD) or a connected device. The app looks like this
Listing 2. Full code of MainActivity.java
import androidx.appcompat.app.AppCompatActivity;

import android.content.Context;
import android.os.Bundle;
import android.view.View;
import android.widget.Button;
import android.widget.Toast;

public class MainActivity extends AppCompatActivity {

  @Override
  protected void onCreate(Bundle savedInstanceState) {
    super.onCreate(savedInstanceState);
    setContentView(R.layout.activity_main);

    Button btn = (Button) findViewById(R.id.button);

    View.OnClickListener listener = new View.OnClickListener() {
      @Override
      public void onClick(View view) {
        Context ctx = MainActivity.this;
        Toast.makeText(ctx, "Hello", Toast.LENGTH_LONG).show();
      }
    };

    btn.setOnClickListener(listener);
  }
}
Download the source code from here https://bit.ly/3bENu2x
Learn Android Studio 4
Learn more tips like this from the book. Can I notify you when the book comes out?