Android Studio Time Savers
What we usually mean when talking about productivity is that we want to do what we need to do in the shortest possible time; that means keyboard shortcuts, templates, snippets etc. In this section, we’ll take a peek at some of what Android Studio has to offer give our productivity a little boost. We won’t go into detail; that’s not the goal, but rather just to show you what’s available in Android Studio.
Contents
Import Samples
One way to boost your productivity and save time is to learn how to create things and discover how they work in Android Studio. The Import Sample feature can save you a lot of time. You can get to this feature from the main menu bar of Android Studio, choose File > New > Import Sample.
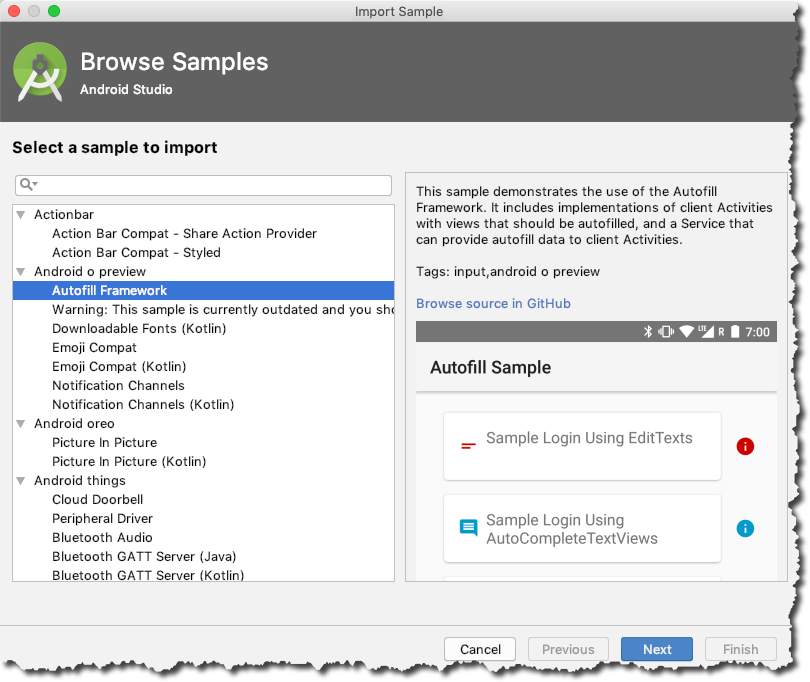
What you see in figure 1 above is a list of code samples you can either browse or create as a local project.
Let’s say I’d like to learn something about the Autofill Framework — like what you see you in figure 1, you can see a preview of what it looks like, and you can also click on the “Browse in GitHub” link. When you click Next, you’ll see dialog that’s somewhat similar to when creating a new project, as shown in figure 2.
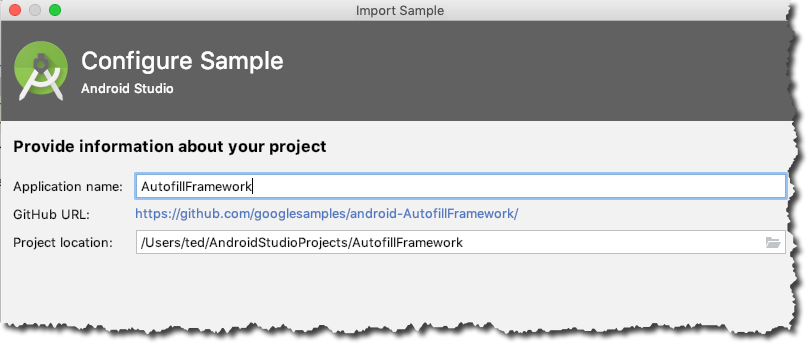
If you click “Finish” on “Import Sample” dialog, Android Studio will create a new project locally and download the sample file from GitHub so you can take a closer look at it and work on right away.
Refactoring
Refactoring is basically rewriting and improving your source code without creating new functionality; this practice helps keep the code SOLID, DRY (don’t repeat yourself) and hence, easier to maintain.
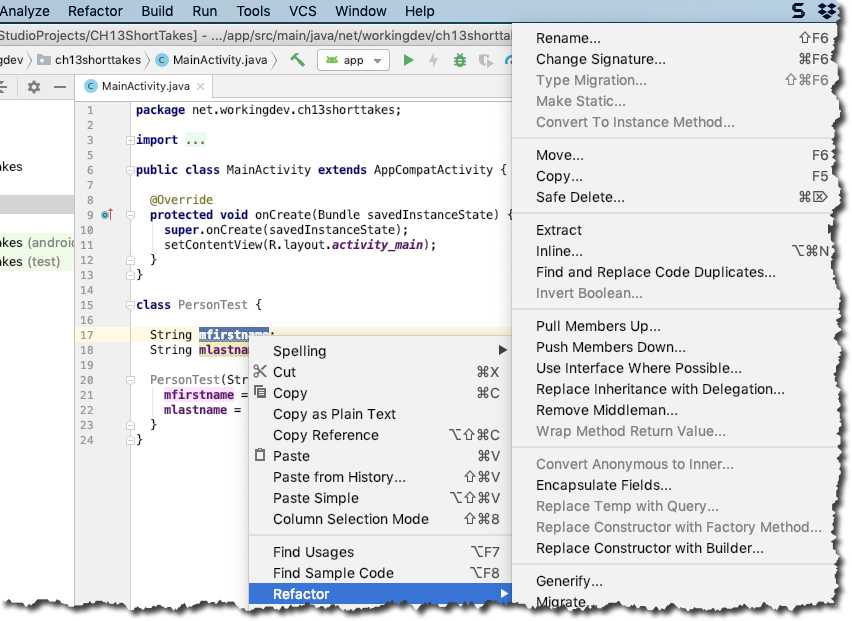
Android Studio has some nifty refactoring capabilities. It’s easy to get started, just select a piece of code that you’d like to refactor, then use the context sensitive right-click, as shown in figure 3. Alternatively, you can also use the keyboard shortcuts — CTRL + T for macOS and CTRL + Alt + Shift + T if you’re on Windows/Linux.
I’m sure you’ve done refactoring many times before, but let’s just jog our memories here.
- Rename. This will let you safely rename variables and other identifiers etc. You should use this instead of Find and Replace. This works across the entire project, and not only in the current file
- Change Signature. This will let you change a method, either its name or the parameters. It also works at a class level e.g. you can turn a class into a generic type and manipulate the type parameters
- Move. Move an element; you can move a method to another class if you want to
- Copy. Let’s you copy elements e.g. currently selected class
- Safe Delete. If you need to delete something, Android Studio will verify that what you’re deleting isn’t in use by anything else in the code base. If it is in use, you’ll be prompted so you can address those things before you actually delete something important
- Extract Constant. Avoid using hard-coded values — you shouldn’t, you know it and you know why. The Extract option for refactoring works not only for constants, you can extract fields, methods, superclasses, variable, parameter and interfaces
There are plenty more options in the Refactor menu; make sure to check the others out.
Generate
Another time-saving feature of Android Studio is the code generator; it’s aptly named because it does exactly what you think it does — it generates code. Let’s take an example; figure 4 shows the keyboard cursor inside a class definition, while the cursor is within the class body, launch the Generator action; from the main menu bar, go to Code > Generate.
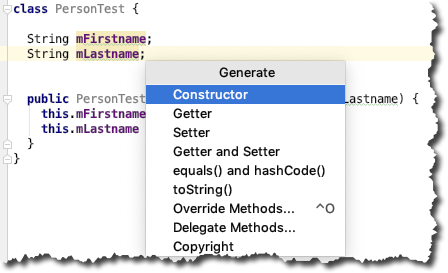
As you can see, you can generate quite a lot of boiler-plate code. When you choose any of the Generate options, Android Studio will generate a generalized stub of code. Let’s choose the getter and setter option, shall we? Let’s say I have a PersonTest class, as shown in figure 8-5, while the keyboard cursor is still within the PersonTest class, go to the main menu bar, then Code > Generate — alternatively, you can use the keyboard shortcut Command + N (macOS) or Alt + Insert (Windows and Linux); then choose to generate Getter and Setter. You’ll see the generate setters and getters dialog, as shown in figure 5.
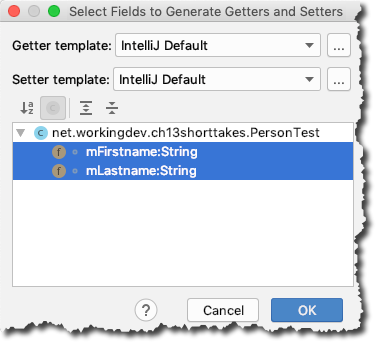
The generator dialog shows all the autodetected fields in our class. It shows us the mFirstname and mLastname member variables; it also lets you do multiple selection. Select both member variables and click OK. Listing 1 shows the PersonTest class after code generation.
Listing 1. PersonTest class
class PersonTest {

  String mFirstname;
  String mLastname;

  public String getmFirstname() {
    return mFirstname;
  }

  public void setmFirstname(String mFirstname) {
    this.mFirstname = mFirstname;
  }

  public String getmLastname() {
    return mLastname;
  }

  public void setmLastname(String mLastname) {
    this.mLastname = mLastname;
  }

  public PersonTest(String mFirstname, String mLastname) {
    this.mFirstname = mFirstname;
    this.mLastname = mLastname;
  }
}
This is pretty neat already. Anything that lets us save on keystrokes is a good thing. I’m guessing you probably have just one thing to nitpick on this example; the method naming isn’t right. You probably would prefer to call** setLastname()** rather than setmLastname() don’t you? We’ll fix that in the next section.
Coding Styles
If you go to Android Studio’s Preferences or Settings, then go to Editor > Code Style > Java, you’ll find that there’s plenty of things you can change about how the editor behaves. Figure 8-7 shows the options for the Code Style, specifically the Java language.
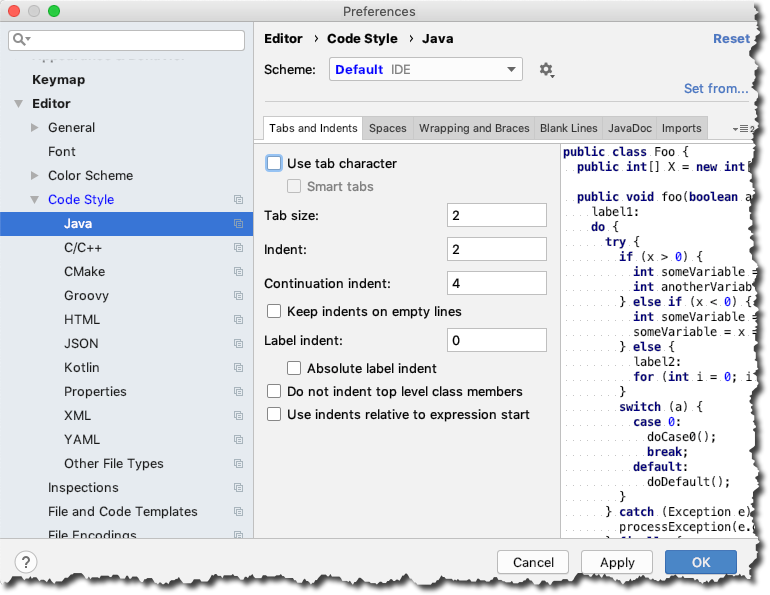
If you want to change the number of spaces for tabs and indents, you can do that in the Tabs and Indents area; be sure to check out the other options in this dialog. What I’d like to do, is to go to the Code Generation tab (shown in figure 7).
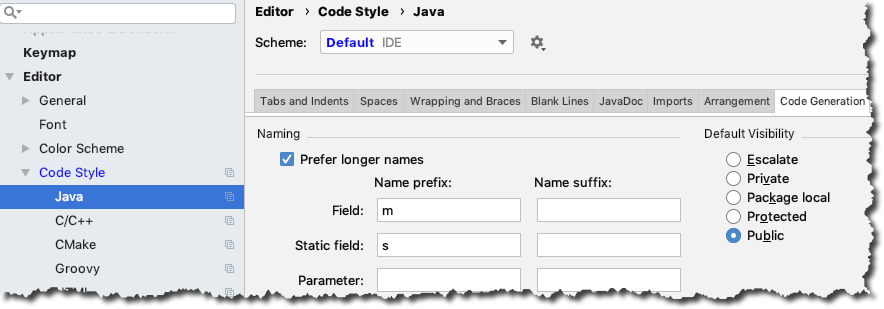
This is where we can tell Android Studio how we name our variables. If you go back to listing 1, you’ll notice that I’d like to prefix my variables with m, like mLastname and mFirstname; initially, Android Studio didn’t know about it, that’s why when I generated some getters and setters for the member vars, it gave us setmLastname() instead of just setLastname().
To tell Android Studio that I prefix my variables with m, I’ll put the m in Name Prefix for Field; as shown in figure 6. Click OK when you’re done.
Now, if I generate some getters and setters, we’ll get the more appropriate method names. Listing 2 shows the re-generated code for PersonTest class.
Listing 2. PersonTest, regenerated
class PersonTest {

  String mFirstname;
  String mLastname;

  public String getFirstname() {
    return mFirstname;
  }

  public void setFirstname(String firstname) {
    mFirstname = firstname;
  }

  public String getLastname() {
    return mLastname;
  }

  public void setLastname(String lastname) {
    mLastname = lastname;
  }

  public PersonTest(String mFirstname, String mLastname) {
    this.mFirstname = mFirstname;
    this.mLastname = mLastname;
  }
}
Live Templates
Another time-saver in Android Studio are Live Templates, it works a lot like those text expander applications, if you have used some of them. The basic idea is when you type a series of characters e.g. datetoday, then the editor will replace it with the text of the actual date today — that’s how live templates work.
If you’ve done some Android programming in the past, you’ve probably made this mistake at least once;
Toast.makeText(MainActivity.this, "no show");
This is easy enough to spot, but some other errors may not be as obvious. Anyway, live templates can help you avoid these hassles. Live templates are shortcuts that are displayed as code-completion options; for example, try typing fbc inside an OnClick handler (or any event handler), as shown in figure 8.
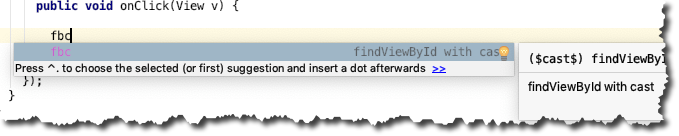
You’ll see the code completion options. Try to press the TAB key and see what happens.
Here are some common built-in templates; as listed in table 1.
Table 1. Common Live Templates
| Abbreviation | Description | Code |
|---|---|---|
| fbc | Find view by ID with cast | ($cast$) findViewById(R.id.$resId$); |
| const | Define an Android style constant | private static final int $name$ = $value$; |
| Toast | Create a new Toast | Toast.makeText($classname$.this, “$text$”).show(); |
| fori | Creates for loop | for(int $INDEX$ = 0;$INDEX$<$LIMIT$;$INDEX++$ ) { $END$ } |
Make sure you check out the other Live Templates, go to the Settings or Preferences window. If you’re on Windows or Linux, go to the main menu bar, then File > Settings > Editor > Live Templates; if you’re on macOS, it’s at Android Studio > Preferences > Editor > Live Templates — you can even create your own Live Templates from there.
Important Keyboard Shortcuts
The Android developer website maintains a page where you can find the keyboard shortcuts for Android Studio, it’s at http://bit.ly/androidstudiokbshortcuts. You should really make it a point to read that page; but before we close the chapter, I’d like to leave you with 6 shortcuts that I find to be very useful for me — it could be useful for you too. Table 2 lists these shortcuts.
| Shortcut | What it does |
|---|---|
| Press Shift twice | It lets you search for a term everywhere. It searches assets folder, gradle files, images resources, codes, xml configuration files etc. If you don’t know which folder to search, just use this |
| CTRL + Space | Command + Space | Android Studio already has code completions and code hinting; this is just a little extra. If you forgot the parameters for a method that uses lots of parameters, you can use this to preview all the variants of method and the corresponding parameters they expect |
| ALT + Insert | Command + N | We’ve used this in the previous section where we generated some code. This is the shortcut for the code generator |
| CTRL + O | Command + O | When you want to override methods, use this shortcut |
| CTRL + - | Command + - | You can use these to expand or collapse code blocks. It’s handy to be able to fold codes when you’re working with a large codebase, these shortcuts will make your life a bit easier when you fold/unfold blocks |
| CTRL + Alt + L | Command + Option + L | Don’t manually indent or re-indent your code — if you messed up the indentation of a for loop or nested conditional blocks, just highlight the code block and use this shortcut |